

Here is how we start. I used a charm pack of scrumptious by Bonnie and Camille for moda fabric. 


I picked out 10-12 squares that I liked together and cut 2 blades out of each using my EZ Dresden ruler. Simply turn the blade over and you will get 2 cuts. You will need 20 blades for this project. As you can see I cut mine at the 5" mark as that is how tall a charm square is. Then take your stack of 20 blades to your sewing machine and fold the top right sides together and sew across the top at 1/4" seam. 
Flip it right side out to make a triangle at the top. Line up the seam on the back center and press.
You can gently poke out the very top with a chop stick or rounded scissor tip like I did. (Carefully! Don't want to poke a hole through the fabric) press.
Then place right side up and press once more just for a quick second. Do this to all blades. 
At this point you can do a quick layout and move blade placement around as you like. Place them in a stack in the order you like and we start sewing them together. Get 2 blades and place right sides together. We will start sewing at the outer point and sew down to the bottom of the blade. 

 I keep my starting threads long so I can tuck them in later. I continue around 1 at a time for 10 blades then begin the 2nd half. I will press all seams to one side before sewing the 2 halves together.
I keep my starting threads long so I can tuck them in later. I continue around 1 at a time for 10 blades then begin the 2nd half. I will press all seams to one side before sewing the 2 halves together. Then connect the 2 halves just like you stitched the other blades and press from the wrong side again. 
Flip over and press from the front. 

Next I measured my bowl I wanted to use as the center. Since this is a pillow and this will be covered in the end I just used white. I used my pin bowl and you can use any bowl you have that covers the center. I did double side however in after thought I could have just done 1 layer and saved myself a few minutes.
I traced the bowl on one fabric (wrong side) and placed another under it. I sewed on the circle line. 
Pinked the edges. Pulled the center apart and cut a hole in ONE layer only. 
Flip it right side out and press. 
Next I cut a 17x17" background square and centered my D plate on it. 
I measured from the valley to the edge of the fabric. It was 3" for me on all 4 sides. I pinned the plate to my background square then centered my white middle circle on the plate and pinned. 
I pinned in every blade and several in the center. 
And now it's time to attach it to the background fabric. Begin in the valley of one blade and either straight top stitch or zig zag stitch around. I like to top stitch this edge.  Keep the needle down and simply lift up the pressure foot at each turn. It is many stops and starts however it really only takes a few minutes for one whole plate.
  I do back stitch 3 stitches at the very beginning and the very end only and I do my best to pull my threads through to the back. Here you see only 3 threads because one broke when I tried to pull it through. (Happens sometimes. This is why we back stitch.) I do like to place a small knot or 2 in my back threads. Extra security.
Keep the needle down and simply lift up the pressure foot at each turn. It is many stops and starts however it really only takes a few minutes for one whole plate. I do back stitch 3 stitches at the very beginning and the very end only and I do my best to pull my threads through to the back. Here you see only 3 threads because one broke when I tried to pull it through. (Happens sometimes. This is why we back stitch.) I do like to place a small knot or 2 in my back threads. Extra security. Next is attaching the center. It's already pinned so I switch to a zig zag stitch for a smoother edge since this will be inside the pocket. 

When stitching circles I go slow. I use my left hand to sort of rotate the fabric around under the needle.  This is where you could be finished with a traditional Dresden plate quilt block. To continue we are going to make another center circle (or whatever shape you like) it will simply be larger. I used a cereal bowl from my kitchen this time.
This is where you could be finished with a traditional Dresden plate quilt block. To continue we are going to make another center circle (or whatever shape you like) it will simply be larger. I used a cereal bowl from my kitchen this time. Trace the bowl on your fabric again. This time you WILL need 2 layers of fabric.  Trace your shape on your fabric and cut it out 1/4" larger all the way around.
Trace your shape on your fabric and cut it out 1/4" larger all the way around. I just free hand cut this with my rotary blade. If you have a pinking blade this is a great spot to use it. (I'll trim this with my pinking shears after I sew. ) we I'll need a straight edge for the top of the pocket. Lay it out in the corner of your mat and adjust how much you'd like to cut off. (The middle of the pocket needs to be WIDER than the top of your pocket. I cut mine at the 6" mark. 
Almost there!! For this part I start stitching towards the end of the straight line, sew around the circle part then back to the straight line. I leave about a 2" opening on the straight top part to flip right sides out. 
Trim 1/4" away from the straight edge and use pinking shears on the round edges. Flip right side out and press. Then we will top stitch the straight edge only. (This will close our turning hole also.) 
Then position on your plate and stitch down the round edge only. 
Pull your threads through and your done with the pillow top! 
Back and finish your pillow anyway you'd like. (Many easy and quick ways to do this out there on Pinterest:) 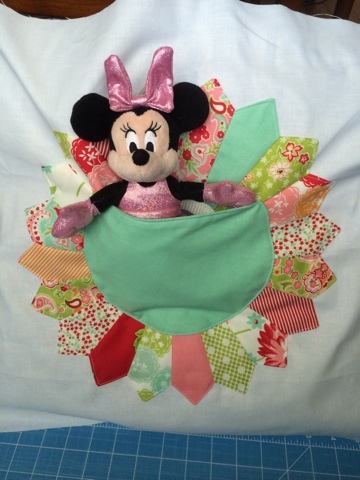
And the Minnie Mouse? She's my daughters favorite! This will be a present for her 2nd birthday in 2 months. Happy sewing!
Blessings, Rebecca
